How to Convert Bank Statement PDF to CSV
Do you have bank or credit card transactions in a PDF but cannot open it in Excel as a table? Excel, Google Sheets, and other spreadsheet apps do not open PDF files directly. Copying text from a PDF does not work for tables either.
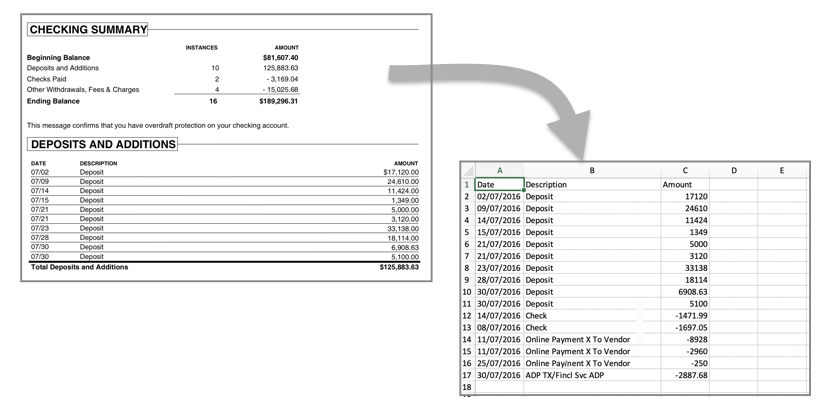
The Solution: Try the ProperConvert (PDF to CSV converter) app. It converts your transactions from PDF to CSV.
PDF (Portable Document Format) is widely used for sharing documents. PDFs look the same on any device or paper. But from a data point of view, PDFs are hard to work with.
Convert transaction PDF to CSV
- The ProperConvert app extracts transactions from PDF files. It creates a CSV ready to import into any spreadsheet, Quicken for Mac, or QuickBooks Online.
- No data entry: convert data you already have in a PDF statement to CSV/Excel. Select only the transactions you want.
- Smart: ProperConvert understands many layouts. It finds columns like date, amount, and description.
- Easy to use: a few clicks converts all your transactions to a format ready for Excel, Quicken for Mac, QuickBooks Online, or another accounting app.
Full tool for your bookkeeping needs
- Set CSV attributes: choose the date format and decimal separator (dot or comma), even if they differ between the PDF and your system.
- Free trial and support: try before you buy and get full support before and after your order.
- Offline: ProperConvert converts all transactions on your computer.
- Convert multiple PDFs at once: select several PDF files and convert them to a single output file.
- Set a page range to speed up or improve conversion.
- Works with text, image, and scanned PDF files.
- Correctly detects amount signs: finds withdrawal and deposit columns, various sign formats, or separate tables for debits and credits.
- Handles files from one page to 100 pages.
- Converts to CSV, XLS, or XLSX Excel files.
How can I use the converter tool to convert transactions from PDF?
The conversion process is simple.
- Download, install, and run the converter.
- Select a PDF with transactions and click Open.
- Review transactions.
- Back up your accounting data before importing any file.
- Click Convert to create a CSV file.
- Optionally choose a different layout (for example, Excel spreadsheet) for a specific app.
- Open the file in Excel, Google Sheets, or another spreadsheet app. Or import it into Quicken for Mac, or upload it to QuickBooks Online (Banking section, Upload button).
Example: How to make CSV for Xero from a PDF statement
This tutorial shows how to convert a PDF from your bank or credit card account and save it as a CSV file that works with Xero.
Step 1. Start the ProperConvert app and load a PDF file
Start the app, select a PDF, and load the file. Review the parsed transactions. Confirm dates, amounts, signs, descriptions, and check numbers are correct.
Check the Payee and Description fields. The app takes the raw description from the PDF and removes noise like dates, numbers, and common terms such as Deposit or POS. What remains is used as the payee name.
Step 2. Select CSV layout for Xero.
There are several CSV layouts to choose from. Regular CSV saves all the columns you see in the app. You can also export to XLSX (Excel), XLS (old Excel), CSV for QuickBooks Online, CSV for Xero, CSV Mint for Quicken for Mac, or Clipboard (paste directly into Excel without saving a file).
For this tutorial, select CSV Xero. The date format is month/day/year or day/month/year depending on your country settings. The converter suggests a format based on your settings, but you can change it. We use month/day/year for Xero.
Check 'Open after conversion' to open the CSV file right away and review it before importing.
Step 3. Import created CSV into Xero.
The file is saved and the last thing is to import it into Xero. We have a test account in Xero. Click 'Accounts' - 'Bank Accounts'.
Select a Checking account. Click 'Manage Account' - 'Import a Statement'.
Xero confirms it supports CSV. Click 'Browse,' select the CSV file, and click 'Import.'
The right column shows names from the CSV file. The left column shows Xero field names. Map Check Number to 'Check No.' and Reference to 'Reference' if available. Check 'Don't import the first line because they are column headings' and click 'Save.'
Before clicking 'Save' or 'Import,' check how many lines will be imported. Then click 'Ok.'
After import, review and map transactions inside Xero. Assign each transaction to an account and a vendor. QuickBooks calls this step 'Mapping.' Xero calls it 'Review.' Transactions go to a review area before they are added to the register.
Learn More
- Quicken - How To Import QIF or QFX into Quicken
- QuickBooks - How to import transactions into Quickbooks
Related articles
- Convert CSV/Excel files to OFX and import into Quickbooks Online, Xero, Microsoft Money
- Convert CSV/Excel to QBO and import into QuickBooks
- How to Convert CSV to QFX Quickly and Easily
- Convert CSV/Excel to QIF and import into Quicken, Banktivity, MYOB #quicken
- What are OFX, QFX, QBO (Web Connect) files?
- Convert PDF to OFX
- Convert PDF statements to a QuickBooks-compatible format