Convert from Excel to Quickbooks
QuickBooks Desktop does not import CSV or Excel files with transactions directly. There is no "Intuit CSV plugin." You need conversion software to convert CSV/Excel to QBO or IIF format first. Then import the converted file into QuickBooks Desktop.
Step 1: Download transactions in CSV or enter in Excel
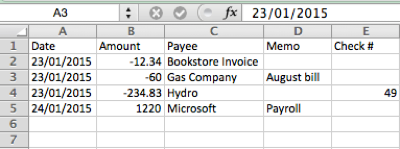
The first line in the CSV file should be a header with column names: date, amount, payee, memo, check number. Each transaction takes one line.
If the transactions were created in Excel, save your Excel/CSV file before converting
Step 2: Determine importable format based on your Quickbooks version (QBO/IIF/OFX)
QuickBooks Desktop imports QBO (web connect) and IIF formats. QBO is for bank and credit card transactions only. IIF allows entries for all accounts but needs more details.
QuickBooks imports QBO files until it is three years old. After that, you must upgrade QuickBooks.
QuickBooks never stops importing IIF files, even when it is older than three years.
QuickBooks uses an interface called Bank Feeds for imported QBO files. After import, you can review transactions:
- Match payee names to vendor records.
- Assign expense/income account (prefilled from matched vendor).
- Add transactions to the register or ignore (delete) them.
Quickbooks Online imports QBO, OFX, CSV files. The best format is OFX (brings the most details).
Step 3: Convert transactions in CSV/Excel format to QBO or IIF format
Download the ProperConvert app to convert to QBO or IIF format.
Start the converter and open the CSV or Excel file. Check how transactions are parsed. Click Review Mapping if needed. Custom mapping helps when the parser cannot detect columns automatically. For example, your CSV may have more than one amount column or more than one description column.
Before converting to a QBO file, set the bank label (INTU.BID), account ID, and account type.
Before converting to an IIF file, set the account type and account name.
Click the "Convert" button to create a QBO or IIF file. The converter uses your CSV/Excel filename and its location as the base name for the new file. You may adjust the filename and its location before converting.
If you check "Open after save," the converter will open the created file. QuickBooks should open QBO and IIF files by default. If the checkbox is not set, import manually:
- For QBO files: File > Utilities > Import > Web Connect.
- For IIF files: File > Utilities > Import > IIF file.
After importing a QBO file, review transactions, match vendor records, and assign expense/income accounts.
Transactions in Bank Feeds are not yet in the register. Review them first, then add or delete them.
IIF files go directly into the register.
Learn More
- QBO - What is QBO (web connect) file format?
- OFX - What Is OFX File Format and How to Open it?
- IIF - What Is IIF File Format and How to Open it?
- QuickBooks - How to import transactions into Quickbooks
- QuickBooks Desktop - How to Import Bank Transactions into QuickBooks Desktop
Related articles
- Convert CSV/Excel to IIF and import into QuickBooks
- Convert CSV to QBJ and Import into Quickbooks Desktop
- Convert CSV/Excel to QBO and import into QuickBooks
- What are OFX, QFX, QBO (Web Connect) files?
- Convert PDF statements to a QuickBooks-compatible format
- Convert QFX to QBO and import into Quickbooks
- Convert QIF to QBO and Import into QuickBooks